

Why it’s important
How long does it take to build an app? What if it’s for two platforms at a time? What if you have to do it all by yourself? Moreover, you take up a challenge to build such an app using technologies that you’ve never worked with before. Some developers say that it takes 3–4 months to make such an app. Some claim that it takes up to 6 months to build an app for just one platform. Here are the results of research done in 2014:
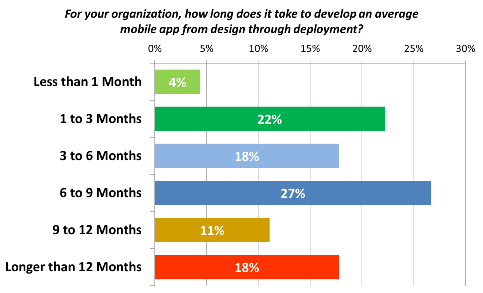 Impressive? Now it’s 2017! So what has changed?
Here is the thing! I want to share my experience on how I managed to build an iOS + Android app by myself in just 20 days using React Native and MobX that I haven’t even known before. Moreover, at that time I knew nothing about React at all, but guys from our team knew a lot. It means that first I needed to get familiar with ReactJs. Okay, let’s look at it more closely!
Getting to know ReactJs and Redux
Since 2013 when Facebook developed ReactJs it became a well-established technology (as evidenced by numerous reports, articles, and reviews on a wide variety of resources). Despite this fact, I haven’t had a chance to put it into practice as I was engaged in projects that used other technologies.
But 2017 came! And it began with a long-awaited acquaintance with ReactJs. Of course, it wasn’t the only technology I had to master. To manage the data flow in the application I had to know Redux, as the most popular of such technologies to date. The simplest way to is to watch the video about it.
After a long time working with Angular JS and the familiar MVC model, switching to a fundamentally new component approach plus Redux was not easy. But the “Practice makes perfect” principle works every time! With each new component or rather a container that uses Redux, I found more and more confidence and sympathy towards it all. After all, I was satisfied with how much time I spent and what I managed to do as a test project. From this point, I was ready to move on to the real project!
Moving on to React Native
Frankly speaking, I was a little cautious about React Native. As this technology is just 2 years old. For comparison, Cordova that I knew and used before is already about 10 years old. But the project was small, so it was just the right time to try something new. And I did!
For a start, I had to get through simple stages to choose the main technologies and principles that I will use in my project. It didn’t last long, approximately for 2 days. Here’s how it was:
#1. Starting a project
There is a lot of pretty good documentation for beginners on the React Native website. A few simple steps and you can start working. Besides, Github has repositories with boilerplates for React Native. There are different sets of used modules. But it seems to me that the standard react-native init is quite enough, at least for the beginning.
#2. Flow control
As I mentioned before, at the beginning of the project I was a little familiar with Redux. But I’ve chosen to use MobX in this project for a variety of factors and arguments. Or to test the way it works. As it is written in the documentation, MobX is a battle tested library that makes state management simple and scalable by transparently applying functional reactive programming.
Besides, it has a package with React component wrapper for combining React with MobX.
#3. Project structure
There are certain in our company. I took it as a basis and made small changes associated with the use of MobX and not Redux.
#4. Firebase
As a backend I used Firebase. It can be easily installed in the project. But if you use it as a database, it is not always convenient.
Of course, most of the time I spent developing the project, fixing bugs and making changes according to the customer demands. I won’t describe this process as it can take lots of time, energy, etc. My goal is to share my findings with you.
After getting through all the stages, I clearly can say that I’ve learned a lot! Moreover, I’ve made my own conclusions and prepared for your lists of my likes and dislikes. Are you ready?


What I liked
- Layout
If you worked in web development before then you need to get used a little to the fact that the elements need to be imported. Also, the div element is Viewnow. And text has to be wrapped in the Text tag and not just be put inside of a button or a view element. However, no more difficulties! By the way, about the buttons — do not look for the usual button. Instead of them, there are Touchable elements in React Native. And perhaps it is the biggest difference!
The basic elements style is Yoga. It is a cross-platform layout engine that allows using flex elements.
Of course, the behavior of flex elements in React Native is also slightly different from the web. However, you get used to it quickly.
In general, as for the layout, through the whole project, there were no significant problems with it. Moreover, there were no situations when for one of the platform everything worked fine but for the other anything had to be changed. Of course, you need to make some small corrections for Android devices. Also, you need not to forget about the status bar for iOS! Although those who worked with Cordova are ready for such things.
- The behavior of the app on a real device
The application works and feels very similar to native applications. Especially you understand it compared to the apps on Cordova.
- A good debugger, as well as hot and live reloading.
- MobX
As the app is small, one common storage was enough. It can keep the data that is used throughout the whole application. Additionally several separate storages I used for bulk containers with forms. So the common storage wasn’t overloaded with unnecessary and rarely used data. Everything was connected easily and worked just fine.
- A possibility to use the well-known libraries from the web, such as
lodash,moment, etc. - Active development of technology and open source
React Native is an open source technology. New versions are released every two weeks. Each release covers more and more gaps, including working with native modules. Third-party modules and libraries are also evolving quite actively.
What I did not like
As you can imagine, it is not so perfect. There are certain minuses:
- The need to change the code
Some plug-ins require you to make changes to the native code and the project settings when assembling with Xcode, and this can not always be a simple and understandable task.
- Faulty modules
For the most part, third-party modules work well and manage their tasks. However, it is quite possible that the module simply does not implement some necessary functionality. So there is nothing left to do as to look for an alternative if it exists.
To give an example, React-native-maps is a module that uses maps in the application. First, I encountered that it is not compatible with the React Native version in the project. Then I found that not all the settings in its API work the right way. Finally, I realized that it is not possible to change the size of the markers with custom images in Android. But as there is no alternative — the only thing that remains is to wait or simply write modules by yourself. If there is just one such module in the project, then it’s not so bad. But if this module is the basis of the project (as an example, maps) or there are several such modules, the development process can come to a deadlock.
- Slow animations and transitions
Since all Javascript is executed in one separate thread — you can have problems with animations and transitions. For example, if the component needs to be rendered during the animation, the animation can be frozen before rendering. Also, this effect can be observed if the component needs to perform complex operations upon initialization. Personally, I felt it when, while navigating to the page, a map with a marker was loaded along with the information — the transition was frozen until the map and the marker were completely drawn. More information about performance can be found on the React Native website.
- MobX (Yes, it is not a mistake!)
It is not a minus of React Native, but I’ll add it to the list. In general, I liked MobX! It is easily installed and configured. But observable arrays have a few unobvious nuances (like doing array.slice() or toJS(array) while using an array in ListView).
It’s better to look through a list of such nuances before starting using MobX.
Conclusion
Despite the minuses, I liked React Native, as well as MobX. Having no experience with them before, I was able to write an application for iOS and Android in a month’s time. Moreover, it is very close to native by user experience and performance. Experience with Cordova was useful while building and configuring the project in Xcode and working with the third-party modules. Otherwise, web development experience is much more useful, especially with React. So if you already have this experience and are familiar with React — you can use React Native almost immediately.
Subscribe


Thank you!
Get ready! You will receive handpicked content right to your inbox.